
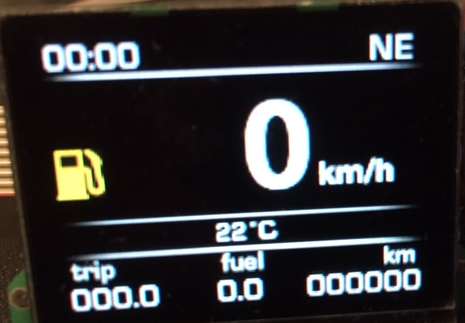
Display layout: top bar
The trip computer is really simple to operate. No user interaction is required for operation, the screen just displays useful information. The screen is divided into four separate areas. The top bar displays current time and (if a compass sensor is installed) current heading. Please note that the Fiero specific circuit board does not support a compass sensor! Time display can be configured to display either 12 or 24 hour format. To set the clock, push the "set" pushbutton until the hour display starts blinking. Now push the "trip reset" pushbutton several times to set the correct hour. If the correct hour is displayed, push the "trip reset" pushbutton for 3 seconds. Now the minutes display will be flashing. Similarly, push the "trip reset" pushbutton several times until the correct minutes are displayed. If the time is correct, push the "trip reset" pushbutton again for 3 seconds to return to normal operating mode. Note: if a GPS is connected to the trip computer, its information will be used to adjust the clock, but only to adjust for deviations of a few minutes.
The top center position is used to display current fuel consumption (Fiero 86-88 V6 ECM only!). This is only displayed if mileage information is received from a suitable ECM, otherwise it is blank.
The positions of the top items as well as the alignment of the text can be configured, so the display shown on this page is only the default configuration.
The bottom bar
The bottom bar displays trip computer information in the left corner and the car's mileage in the right corner. The trip display can display various items, these can be changed by pushing the "trip reset" pushbutton, which cycles through these items:
- Trip distance (always three digits, decimal point and a single digit, e.g. 0123.3) The distance is in the configured unit, i.e. either km or miles.
- Trip time (always time format with a color, e.g. 1:23)
- Trip average speed (always 1-3 digits without colon or decimal point, e.g. 123). The speed is displayed in the same unit as the vehicle speed in the main window
- Trip average fuel consumption (always two digits, decimal point and a single digit, e.g. 12.3)
By pressing the "trip reset" pushbutton for more than a second (this duration is configurable), all trip data resets to zero. If the trip data overflows, it also resets to zero.
On the Fiero with a 86-88 ECM, total fuel consumed information is displayed in the center of the bottom bar. The fuel counter counts up, and should be reset when the car is refueled. To reset the fuel counter, turn on the ignition after refueling while keeping the "trip reset" pushbutton pressed. A short beep is played to confirm successful reset.
The info bar
Above the bottom bar is the info bar, which currently only contains temperature information from the outside temperature sensor input. The display can be configured to display either Celsius or Fahrenheit. If the temperature is near freezing, a snowflake is also displayed here and a warning beep is sounded to alert the driver of hazardous road conditions. The warning temperature threshold is also configurable. Alternatively you can display the system battery voltage here.
Main window
The remaining screen area is called the main window. The center of the main window prominently displays the current vehicle speed in either mph or km/h. Again, several parameters influencing the speed display can be configured. The area to the left of the current speed can display a yellow "low fuel icon" on the Fiero. For this feature the fuel counter is used and internally subtracts the used fuel from a configurable fuel tank capacity. If the consumption exceeds the configured threshold, an audible beep is sounded and the warning icon is displayed. The icon disappears if the fuel counter is reset after refueling.
The area to the right above the km/h or mls unit display is reserved for GPS use. If a suitable GPS receiver is connected to the GPS input, a satellite dish is displayed in either red or green to signal GPS lock status, and displays the number of satellites next to it. If lock has been established for a configurable number of seconds, the satellite symbol disappears. If the GPS information contains a heading, this heading can be used to supply the heading information for the top bar if no compass sensor is present. The GPS information can be used to alert the user of local points of interest (POI) if the car is close enough. A beep is sounded and a configurable icon is displayed while the POI is near.